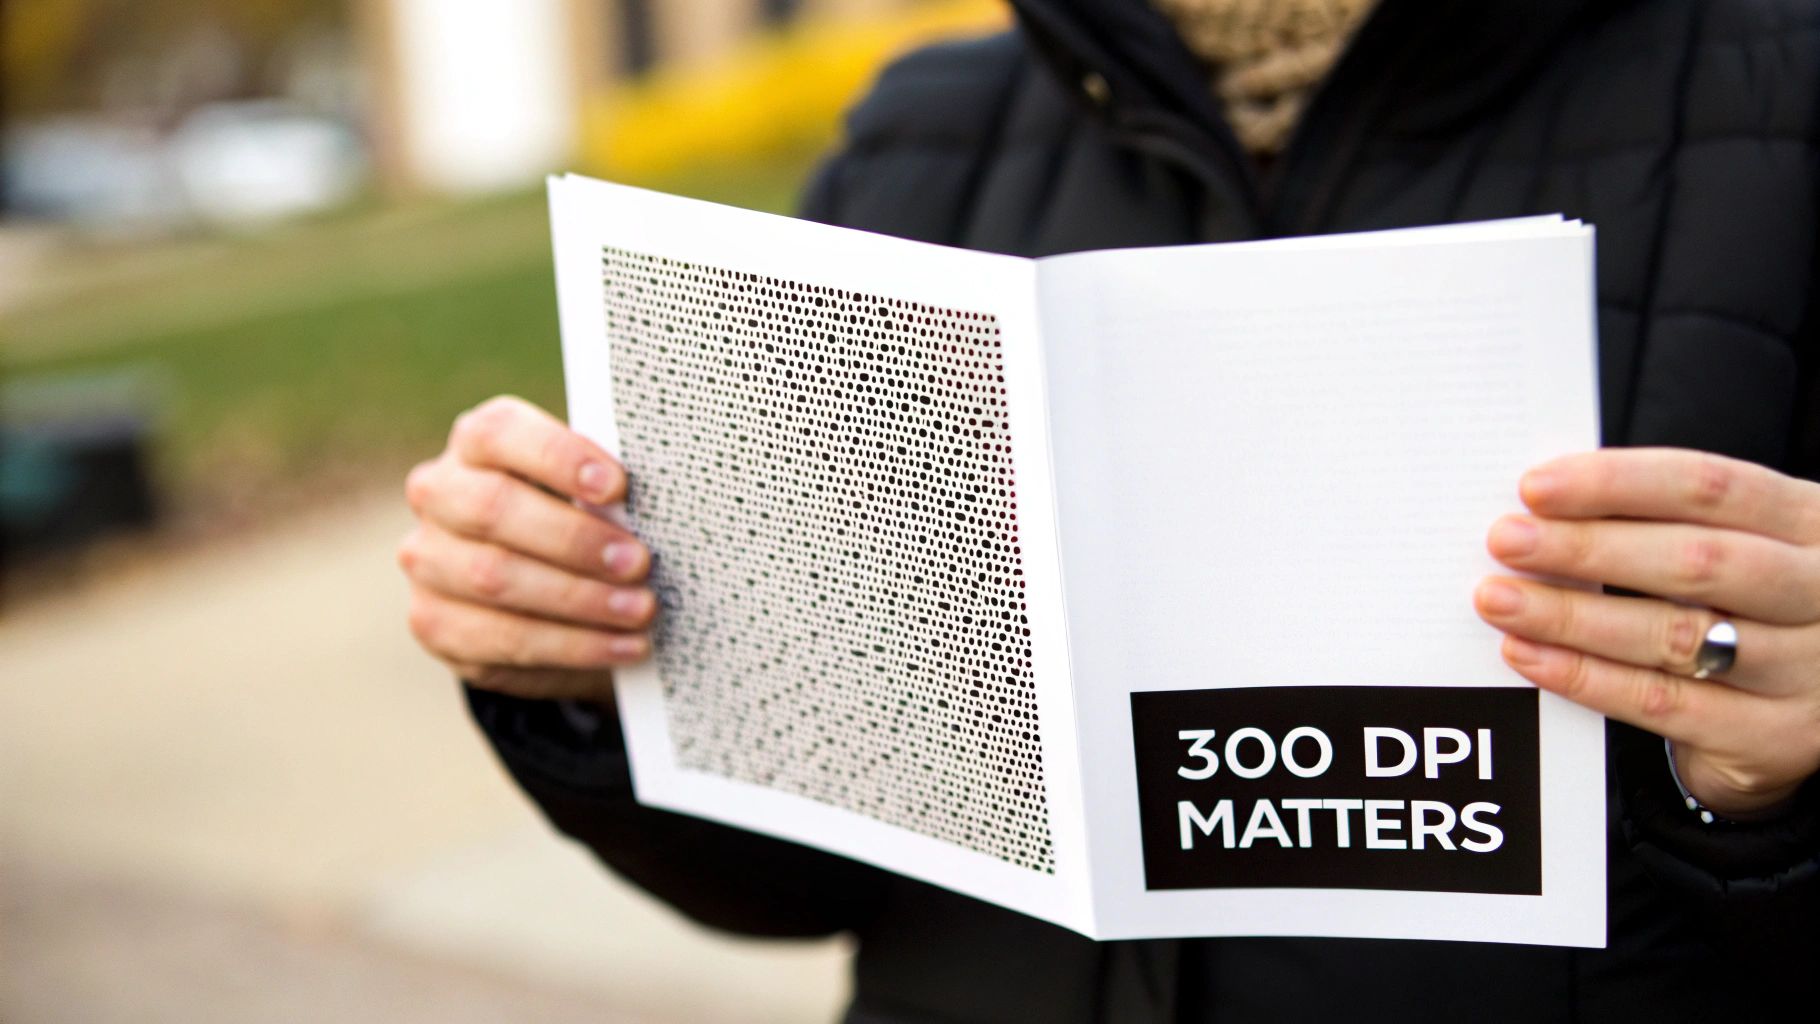
For truly professional, crisp print results, the magic number to remember is 300 Dots Per Inch (DPI). This is the industry standard for anything that will be viewed up close, like business cards, flyers, and brochures. Think of it as the secret ingredient that makes your printed materials look sharp and clear, not fuzzy or pixelated.
Why DPI Is Your Most Important Print Setting
Getting those crystal-clear prints you're after all starts with one critical setting: DPI. Let's break it down with an analogy. Picture your printed image as a detailed mosaic. Each tiny ink dot the printer puts on the paper is like a single tile. The more tiles you can pack into a square inch, the sharper, smoother, and more vibrant the final picture will be.
A higher DPI simply means more dots are being printed in that small space. This density is what creates smooth gradients, sharp text, and detailed images, getting rid of any fuzzy edges or blocky pixels. That’s why getting the DPI right isn't just a technical detail—it's absolutely essential for producing materials that truly represent the quality of your brand.
The Gold Standard for Print Quality
When you're getting your files ready for the printer, 300 DPI should be your go-to benchmark. For items people will hold in their hands, from marketing materials to instruction manuals, this resolution guarantees that every letter and line is perfectly defined. Dipping below this standard is a gamble; you risk a blurry, unprofessional finish that can seriously weaken your message.
On the other hand, for projects like fine art reproductions or high-end photography where every subtle detail counts, bumping the resolution up to 600 DPI can produce stunning, gallery-worthy results. Understanding these nuances is key for clients from Latham to Hopewell Junction, because choosing the right DPI unlocks both superior quality and cost-effective production. You can dive deeper into how digital printing standards are evolving to see where the industry is headed.
Key Takeaway: Setting the right DPI isn't just a box to check. It's a strategic decision that ensures your investment in printing pays off with materials that are not just readable, but visually impressive. This directly shapes how customers perceive your business.
Having this foundational knowledge allows you to prepare your design files with confidence, sidestep common printing pitfalls, and have much clearer conversations with print providers like us here at Camelot. Mastering this one concept is the first real step toward getting flawless results on every single project.
You've probably heard the terms DPI and PPI thrown around, often used like they mean the same thing. They don't. Getting this one distinction right is the key to avoiding that sinking feeling when your prints come back blurry or pixelated.
Let's clear it up. Think of PPI (Pixels Per Inch) as the digital side of the coin. It's all about your screen. It measures how many pixels are crammed into one inch of your digital image. Your average computer monitor displays images at 72 or 96 PPI, which looks perfectly sharp on a backlit screen.
DPI, on the other hand, lives in the physical world of ink and paper.
From Digital Pixels to Physical Dots
When you hit 'print,' a commercial printer has to translate your digital file into a physical object. It does this by laying down tiny dots of ink. DPI (Dots Per Inch) is the measure of how many of those little ink dots are placed within a one-inch line on the paper.
Here’s where things go wrong. That beautiful image on your 72 PPI monitor just doesn't have enough raw information to create a crisp printed product. A professional printer needs a lot more data to work with.
When you ask a printer to create a 300 DPI print from a 72 PPI file, it’s forced to guess what should go in the gaps. It essentially blows up the existing pixels, stretching them out, which leads directly to that fuzzy, pixelated look we all dread.
Key Takeaway: PPI is the digital recipe, defining the potential quality of your image. DPI is how the printer physically bakes the cake using ink. You can't make a high-quality cake (high-DPI print) from a low-quality recipe (low-PPI file).
Why This Translation Is Everything
Let's try an analogy. Imagine you have a mosaic made from 72 big, chunky tiles. From across the room, it looks pretty good. That’s your 72 PPI image on a screen.
Now, imagine you have to recreate that same mosaic in the same physical size, but this time using 300 tiny, detailed tiles. This is your 300 DPI print.
You can’t just stretch the big tiles—you’d see all the gaps and rough edges. To create a smooth, detailed picture with the small tiles, you needed to have started with a much more detailed plan. It’s the exact same principle for DPI in printing. Your digital file has to contain enough pixel data from the very beginning to build a dense, sharp image with ink.
Choosing the Right DPI for Your Print Project
Not every print project is created equal, and your DPI for printing shouldn't be a one-size-fits-all setting either. The most critical factor in picking the right resolution is simply the viewing distance. What works perfectly for a business card you hold in your hand would be complete overkill for a giant banner hanging across a street, bloating your file sizes for no good reason.
Think about it this way: the closer someone is to your printed piece, the more detail their eyes can pick up. That means anything held in hand needs a really high density of dots to look sharp and professional. But as you step back, your eyes naturally start to blend those dots together. That’s why the need for super-high resolution drops off as the viewing distance increases.
This diagram helps visualize how the digital world of your screen translates to the physical world of paper.
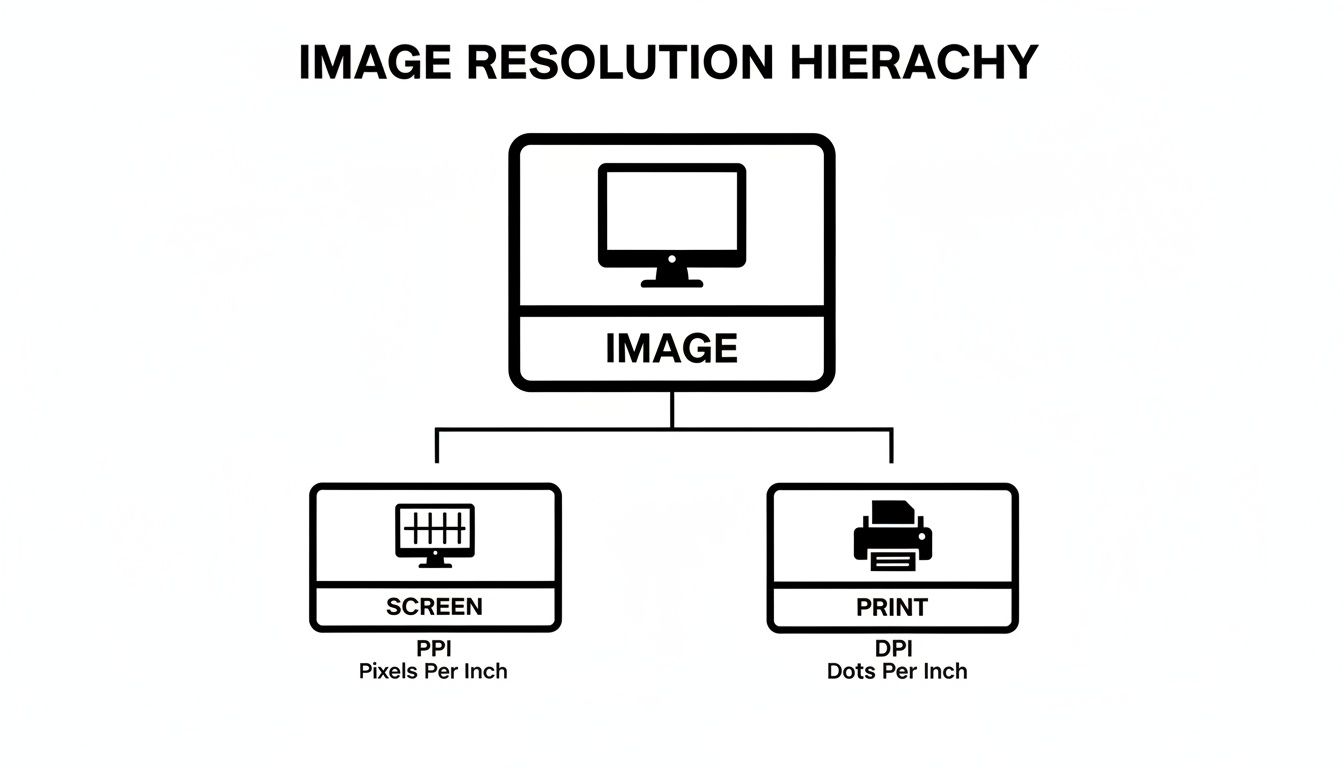
The big takeaway is that screen resolution and print resolution are two different beasts. A great print job hinges on getting that translation from pixels to dots just right.
Small Items Viewed Up Close
For anything your audience will hold in their hands or see from just a few inches away, 300 DPI is the gold standard. It's not really negotiable for the everyday marketing materials that businesses count on.
- Business Cards: This is often the first tangible piece of your brand someone interacts with, so sharpness is everything. 300 DPI keeps your logo and text perfectly crisp.
- Flyers and Brochures: People read these up close. A lower resolution will make your text look fuzzy and your images unprofessional, completely torpedoing your message.
- Postcards and Mailers: You need vibrant, clear images to stand out in a stack of mail. Stick with 300 DPI to make sure they look fantastic.
Medium-Sized Prints Viewed from a Distance
As your print projects get bigger, so does the typical viewing distance. Think about posters on a wall or signs in a shop. For these, you can safely lower the resolution without anyone noticing a drop in quality.
A DPI between 150 and 200 is the sweet spot here. It keeps your file sizes from getting out of hand while still delivering a sharp, clean look from a few feet away.
Pro Tip: Lowering the DPI for larger prints isn't about cutting corners; it's about being smart. A 150 DPI poster viewed from five feet away looks just as sharp to the human eye as a 300 DPI business card held in your hand.
Large-Format Banners and Displays
Now we're talking about the big stuff—trade show banners, vinyl displays, maybe even billboards. The viewing distance for these can be 10 feet or more. At this scale, an ultra-high DPI is not only unnecessary but also creates gigantic files that are a pain to work with and upload.
For these massive projects, a resolution between 75 to 150 DPI is the industry standard and works perfectly. From way back where your audience is standing, the print will look completely clear and make the impact you're looking for.
Specialty and Fine Art Printing
Of course, there are times when you might want to push beyond that 300 DPI rule. For high-end fine art Giclée prints or detailed photography where every last bit of texture matters, you can go as high as 600 DPI.
This higher dot density is all about capturing subtle tonal shifts and intricate details with incredible accuracy. It’s what separates a standard print from a true gallery-quality piece.
How to Check and Set DPI in Your Design Software
Knowing your file's DPI is the first step, but figuring out where to find that setting can sometimes feel like a digital scavenger hunt. The good news is that most professional design programs make it pretty easy once you know where to look. Getting this right from the very beginning of a project is the only way to guarantee a sharp, high-quality print.
Why the fuss about getting it right from the start? Trying to "increase" the DPI after the fact is like trying to add more flour to a cake that's already baked. It just doesn't work. The software has to guess and stretch the pixels that are already there, which almost always results in a blurry, pixelated mess. For professional results, setting the correct DPI from the get-go is non-negotiable.
Adobe Photoshop: Your Go-To for Pixels
Adobe Photoshop is a raster-based program, which is a fancy way of saying it thinks in pixels. This makes DPI a core, foundational setting. It’s the perfect tool for checking and adjusting the resolution of photos and any other pixel-based artwork.
How to Check an Existing File:
- Pop open your image in Photoshop.
- Head up to the top menu and select Image > Image Size.
- A dialog box will appear showing the dimensions and, most importantly, the Resolution (that's your DPI/PPI).
Here’s a look at the Image Size dialog box in Photoshop.
This little window perfectly illustrates the relationship between pixel dimensions, physical size, and resolution. If you change one value, you'll see the others adjust accordingly.
When starting a new print project from scratch, simply type 300 into the Resolution field in the "New Document" window. Just make sure the unit is set to "Pixels/Inch." Do that, and your canvas will be perfectly primed for a high-quality print job.
Adobe Illustrator and Canva: A Different Approach
Unlike Photoshop, Adobe Illustrator is a vector-based program. This means it creates graphics using mathematical equations, not pixels. The huge advantage here is that vectors can be scaled to any size—from a postage stamp to a billboard—without losing an ounce of quality. Because of this, you don't really set a document-wide DPI in the same way.
The resolution comes into play when you export your work.
Key Insight: In Illustrator, your main job is to create clean, crisp vector artwork. The DPI setting only becomes critical when you save or export your design into a raster format like a JPEG, TIFF, or PDF for the printer. Just go to File > Export > Export As, pick your format, and you'll find an option to set the resolution to 300 PPI.
Canva, on the other hand, is built for simplicity. It handles the technical stuff for you based on the template you pick. If you choose a print template like "Flyer" or "Business Card," Canva automatically sets you up with a high-resolution, print-ready file. When you're ready to download, just be sure to select the PDF Print option. This ensures your file is saved at the quality needed for a great-looking final product.
The world of printing is always advancing, with modern presses achieving incredible levels of detail. Some machines can now print at an astonishing 3600x2400 DPI, allowing for automated quality checks on huge print runs. Here at Camelot, our own state-of-the-art equipment prints at a native 2400 DPI, ensuring every project for our Hudson Valley partners has maximum impact. It's a testament to how the commercial printing market continues to innovate and push the boundaries of what's possible.
Preparing Your Files for Flawless Printing
Getting your DPI right is a huge win, but it's just one piece of the print-ready puzzle. To make sure the final product looks exactly like it does on your screen, a few other setup details are absolutely essential. Think of these as the final quality checks that prevent common printing headaches and deliver a professional piece every single time.
First up, let’s talk color. Your computer screen shines light to create images using the RGB (Red, Green, Blue) color model. Professional print presses, on the other hand, lay down ink using the CMYK (Cyan, Magenta, Yellow, Black) model.
If you send an RGB file to a printer, its software has to guess how to convert those light-based colors into ink. The result? Colors can look muddy, flat, or just plain wrong. The pro move is to set your document’s color space to CMYK from the very beginning.
The Importance of Print Bleed
Ever gotten a stack of business cards with a frustrating sliver of white along one edge? That’s what happens when a design has no bleed. A bleed is simply a small, extra margin of your design that extends past the final trim line.
During the cutting process, there's always a tiny bit of shift in the paper stack. That extra margin—that bleed—is your insurance policy, making sure your background color or image goes right to the very edge, even if the cut is a hair off. For most projects, the industry standard is a 0.125-inch (or 1/8") bleed on all sides.
Why It Matters: Adding a bleed is a simple, proactive step that acts as a safety net. It guarantees a professional, edge-to-edge finish for your business cards, flyers, and brochures, making your design look intentional and complete.
The printing world has seen a massive move to digital presses. In fact, by 2023, digital printing made up 55.6% of the US market, and it's expected to hit 64.4% by 2026. This shift is partly driven by amazing new presses that can achieve resolutions up to 3600 DPI. This trend just reinforces why perfect file prep is so critical for everything from a 1200 DPI legal document to a 600 DPI art print. You can explore more about the digital printing market growth to see where things are headed.
Choosing the Best File Format
Finally, how you save your file matters just as much as how you build it. A JPG is fine for a website, but it uses "lossy" compression. This means it throws out a little bit of data every time you save it, which slowly degrades the quality.
For printing, you need a format that protects every pixel of detail. Here are the heavy hitters:
- PDF (Portable Document Format): This is the undisputed king of print. A high-quality PDF locks in your fonts, images, and layout into one self-contained file that looks the same no matter who opens it.
- TIFF (Tagged Image File Format): Perfect for high-resolution photography. TIFF files use "lossless" compression, which means all your original image data stays perfectly intact, ensuring maximum quality.
By locking in the right color mode, adding a proper bleed, and choosing a print-ready format, you ensure the high DPI for printing you worked so hard to achieve translates beautifully onto paper.
Common Questions About DPI for Printing
Even after you get the hang of print resolution, a few practical questions always seem to pop up mid-project. Working through the nitty-gritty of DPI for printing can feel like a maze, but the answers are usually pretty simple once you know them. Let’s walk through some of the most common questions we get from clients to help you prep your files like a pro.
Think of this as the real-world troubleshooting guide that can save you from a costly reprint.
Can I Just Increase the DPI of a Low-Resolution Image?
This is easily the most frequent question we hear, and the short answer is no—not in a way that actually works. While a program like Adobe Photoshop will let you change an image’s DPI value from 72 to 300, it can’t invent detail that was never there. The software is forced to guess what should go in the gaps it creates.
This process is called resampling (or interpolation), and it’s a bit like stretching a small rubber stamp to cover a huge area. The ink just gets thinner. The result is often an image that looks even blurrier and more pixelated than when you started.
The Golden Rule: Always start with a high-resolution image. You can always shrink a high-res image down without losing quality, but you can never truly make a low-res image bigger and sharper.
Does a Higher DPI Always Mean Better Quality?
Not really. For almost every standard print job—we're talking brochures, flyers, and business cards—300 DPI is the gold standard for a reason. At a normal viewing distance, the human eye just can't see a noticeable improvement beyond that point.
Cranking your files up to 600 DPI won't make your business cards look twice as sharp, but it will create a massive file. This can bog down your computer, make your files a nightmare to upload, and overcomplicate the printing process for no real-world benefit.
- So, when is higher DPI better? You'll see resolutions like 600 or even 1200 DPI used for highly specialized work, like fine art reproductions (Giclée prints) or gallery-quality photography. In those cases, capturing microscopic detail is the whole point. For your business printing needs, 300 DPI is the perfect sweet spot between quality and file size.
What Happens If I Print a 72 DPI Image?
An image at 72 DPI is built for a screen, not for a printing press. When you send a 72 DPI file to print, the final product is going to look fuzzy, pixelated, and just plain unprofessional.
The individual dots of ink will be so large that you can actually see them, creating jagged edges on text and a blocky, low-quality look for any photos. This is the classic reason why a design that looks great on your monitor comes out looking terrible on paper. A low-resolution print, unfortunately, can make your whole brand look like it cuts corners.
Why Do Printers Ask for Different DPI for Banners?
This is a great question, and it all comes down to one simple thing: viewing distance.
How close you are to a printed item completely changes how much detail your eyes can process. It’s the core principle behind all professional printing standards.
Close Viewing: You hold a business card or a brochure right up to your face. To keep the image looking smooth and solid, the dots of ink need to be packed together tightly—that’s why we need 300 DPI.
Distant Viewing: You see a giant banner or a trade show display from across the room. From that far away, your eyes naturally blend the dots. A lower resolution of 100-150 DPI will look perfectly crisp and clear, with the added benefit of keeping the file size manageable for such a large print.
So, asking for a different DPI isn't an arbitrary rule. It’s just a smart, practical approach based on how we all see the world.
At Camelot Print & Copy Centers, we take the guesswork out of printing. Whether you need crisp business cards or a massive, eye-catching banner, our team is here to ensure your files are perfectly prepared for a flawless result. Start your next project with confidence by visiting us at https://www.camelotprintandcopy.us.